Now that you've got your National Match rear sight assembly, here's how to install and use it!
1. NATIONAL MATCH REAR SIGHT ASSEMBLY WITH 1/2 MINUTE WINDAGE AND 1/2 MINUTE ELEVATION
2. FITTING THE NM REAR SIGHT APERTURE
| A. Using a fine file, modify the underside and end of the aperture as shown, so that the aperture will not bottom out in the rear sight receiver well. |
|
Figure 2A: Fitting the aperture to the rear sight well |
| B. To fit the aperture to the NM/2A base, the outside edges have to be brought in by stoning or with a fine file. Remove the same amount of metal from both sides slowly, checking the fit often. You want this to be a tight fit with no play from left to right. |
|
Figure 2B: Fitting the aperture to the NM/2A base |
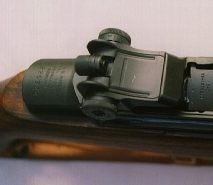
3. INSTALLING THE NM REAR SIGHT ASSEMBLY
| Extreme care should be used in
handling the parts. Both the windage knob and rear sight base have a fine
pitch thread. Because of the precision made threads, particular attention
should be given to the following both prior to and during assembly:
A. Insert the rear sight base through the opening of the cover. B. Place the front lip of the cover into the recess at the forward portion of the rear sight receiver well. Raise the base slightly, exposing the rear portion of the cover. With a screwdriver, apply pressure to the rear of the cover in a horizontal direction until the cover snaps into place and is firmly retained by the receiver. C. Insert the aperture assembly into the aperture groove in the base and lower it until it bottoms against the receiver. D. Caution should be exercised in starting the windage knob threads into the rear sight base to preclude the danger of cross-threading. Mating threads must be free of all foreign matter. With the left hand, apply pressure to the base forward and to the right of the receiver. Insert and turn the windage knob carefully to engage the mating threads. Continue to turn the windage knob until the base is tightly seated against the right receiver ear. E. Insert the pinion of the elevating knob assembly through the hole on the left side of the receiver ear, meshing the pinion teeth with the mating teeth of the aperture. Simultaneously align, by feel, the flat at the end of the pinion shaft with the mating contour of the lock, housed in the center of the windage knob. Thread the rear sight nut (in the windage knob) onto the pinion shaft. Some manipulation of the parts may be necessary to permit assembly. Tighten the rear sight nut until both elevating and windage knobs become inoperative. By backing off the rear sight nut one or more clicks (one-half-turn per click) both knobs will then become operative. The graduation mark on the rear sight base can then be aligned with the graduation mark on the receiver. F. Tighten the rear sight elevation knob securely. Settings of various ranges are attained in terms of the number of clicks from the lowest position of the aperture once the sight has been "zeroed" in at the respective ranges. Once your sight settings have been established. the rear sight mechanism should be left intact to preserve sight zero. |